Static Website Hosting Using AWS - S3 Bucket & Cloudfront
Firstly lets start by stating the services within this post may incurr a cost to the AWS Account being used, and the AWS Pricing documentation for each of the services will need to be consulted to establish if there are any charges to be applied based on use or to an AWS Representative / Consulting someone with AWS Experience to establish if a cost will be applied.
The Task
Automating the Deployment of a Website.. That is hosted online in a simple cost efficient solution that doesn’t break the bank, nor require experience as a Website Developer in order to maintain and update the content of the site.
- Source Control - Track Changes - Github
- CI/CD Pipelines - Automated workflows for software - Github Actions
- Open-source Static Site Generator - Hugo
- Object storage service - AWS S3
- Content Delivery Network(CDN) - AWS Cloudfront
Prerequisites
In terms of prerequisites there are few that need to be taken into account:
- Github Repository created and cloned down ready to use
- AWS Account - Created and how to navigate around the available services.
Overview of Steps / What is covered in this post
Below are the steps that will be explained to accomplish the task of Automating The Deployment of a Website:
- Create a Hugo website with relevant configuration.
- S3 - Create an S3 Bucket with the
Domain Nameas the Bucket Name. - Cloudfront - Create a Distribution, with the Static Website Hosting Name of the S3 Bucket created in the previous step.
- Setup Github Action to Deploy to S3 Bucket, as well as Invalidate the CloudFront Distribution so new content is seen straight away on the URL / website once code is commited to Github.
Hugo Website
Hugo is an open-source static website generator, with a variety of themes and configuration options. Hugo’s own documentation is very useful for amending and adding content onto one of the existing themes. There is also support from Hugo to create a unique theme as well.
Premade themes can be found here —>> https://themes.gohugo.io/, or alternativitely create a unique theme.
Note: When configuring the theme, make sure that the configuration is within a Github Respository for Source Control. This will also provide support for using Github Actions to automate the deployment by enabling the next part of the process, Building & Deploying the Website Project.
Once happy with the theme and content, commit the code to Github.
S3 Bucket Creating With Name, Configuration
Note: All new bucket names must be unique, not just to the account being used but within AWS itself. So further research maybe required before continuning, if a bucket name already in use an error message appears when trying to create the bucket.
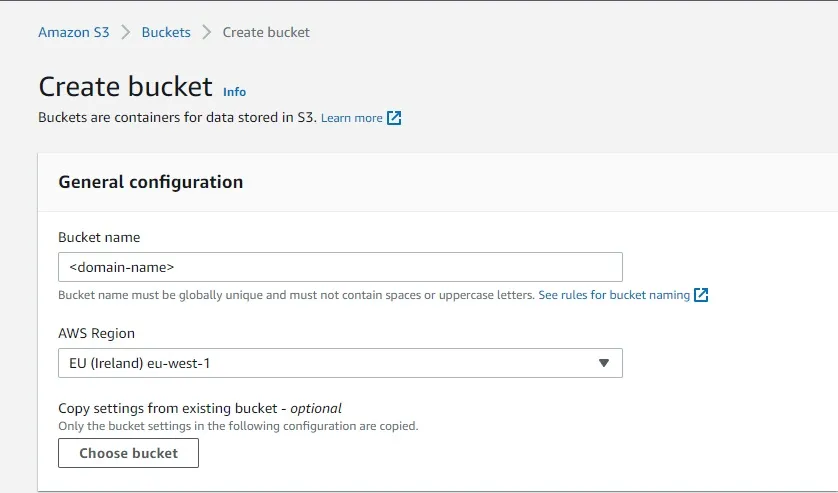
An S3 Bucket for the website, that the hugo project configuration above is going to upload into needs to be created.
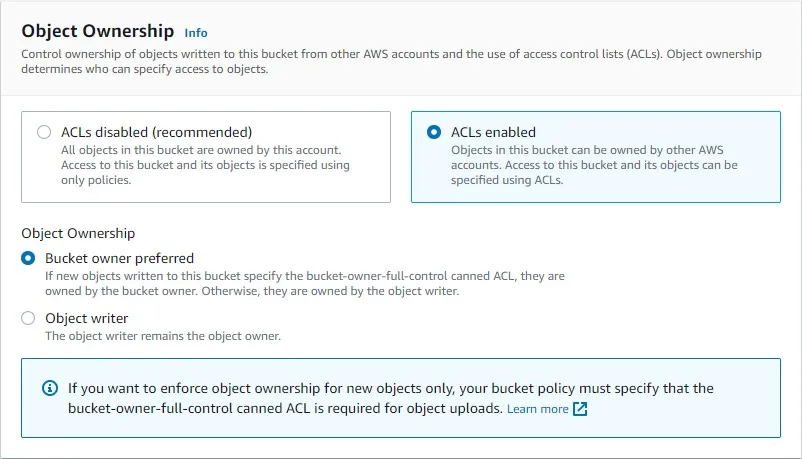
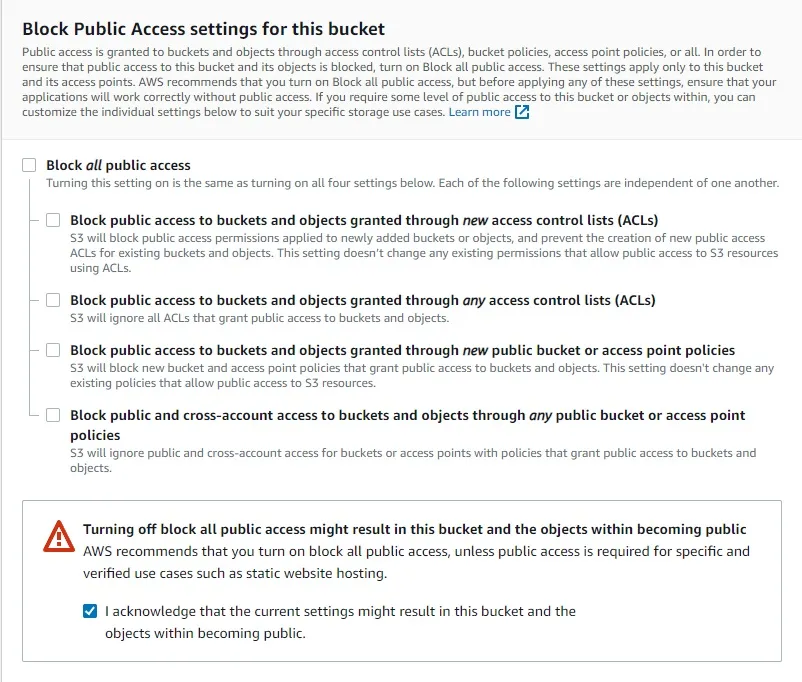
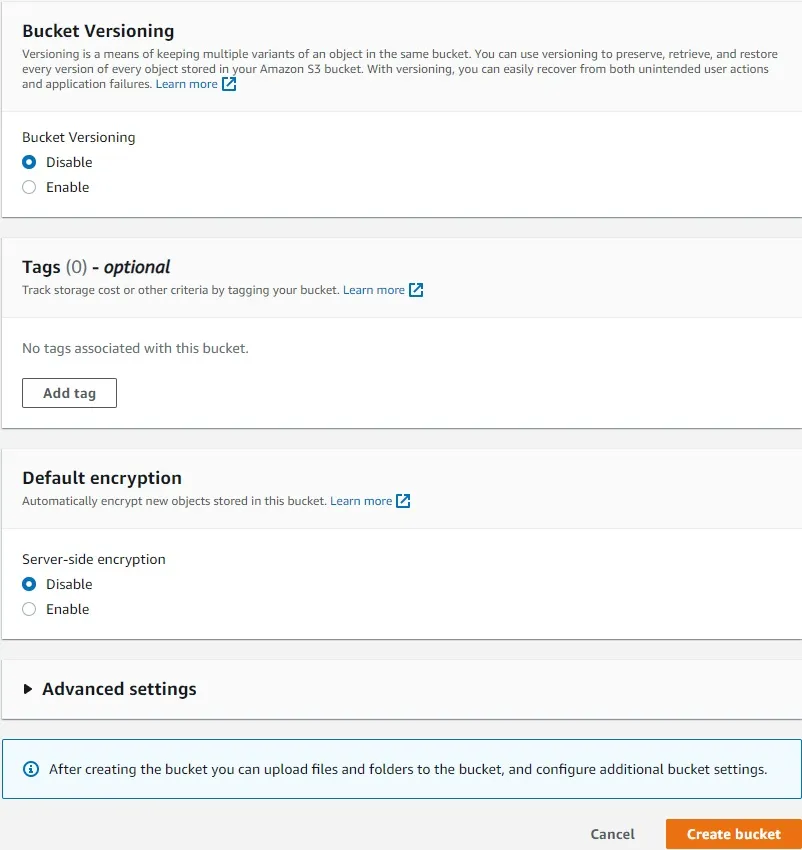
To do this, within the AWS S3 Bucket screen, click on the Create Bucket button. Once that has been done the following screen should appear, which will allow the naming of the new bucket as well as configuration. Amend the settings the ones shown within the screenshots below, once done press Create bucket.
Note: <domain-name> or public-domain references will need to be amended to the domain that is being used. As well as any region settings to somewhere relevant (should it be required) in this case EU (Ireland) eu-west-1 is the chosen region. There are a variety of regions available within AWS, but those will not be covered not shown within this guide!*
S3 Bucket - Addtional Settings - Enabling Static Website Hosting
The bucket should now of been sucessfully created after completing the above steps. Now there are some additional settings that need to be amended, which enable Static Website Hosting on the bucket itself. Which will be required to test later on in this guide, but also can be used as a troubleshooting step should there be any issues with the deployment.
Select the bucket, and press properties.

Find the option for Static website hosting - At the time of writing this guide in August 2022, this was at the very bottom of the properties window. However this location may of been updated in accordance with other features and settings that have since been added by AWS.
To specifically enabled the Static website hosting option on the bucket, press Edit.

Now the following screen should appear that will allow setting a variety of options. Make sure to match the settings with the ones below:
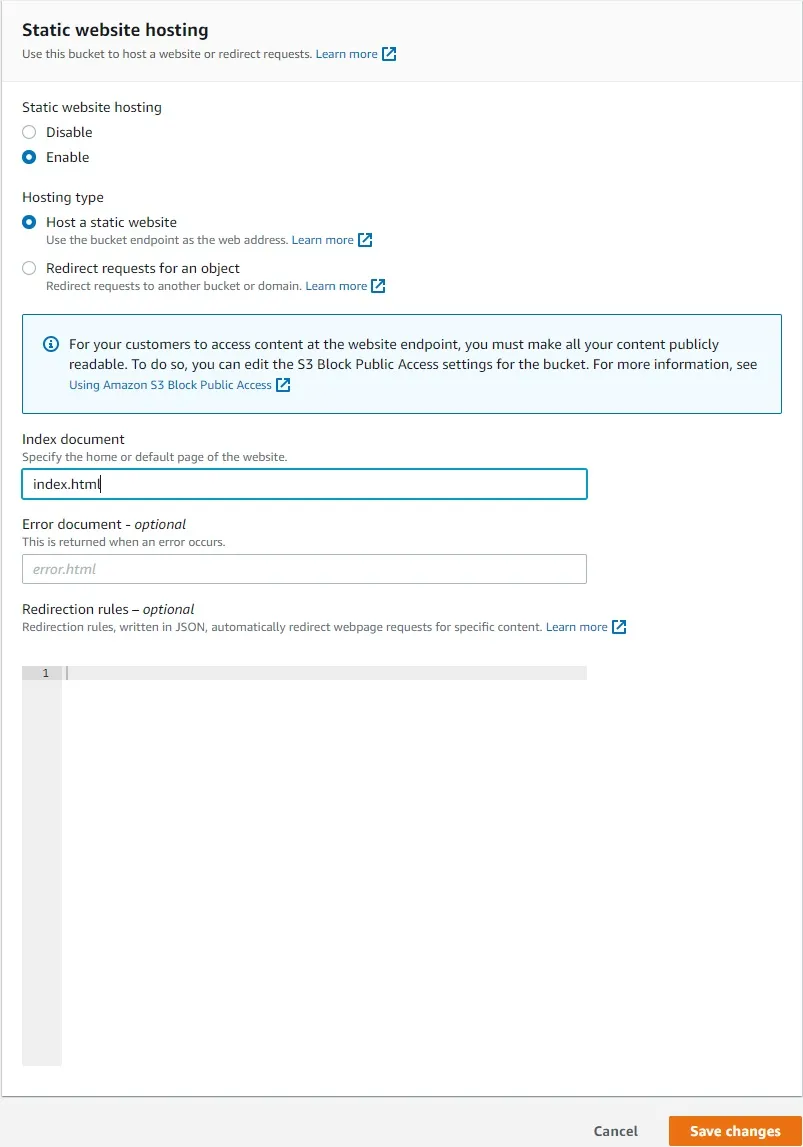
Save the changes to the Static website hosting.
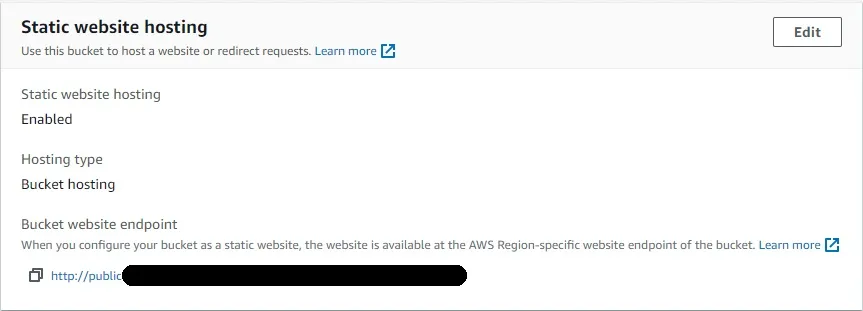
These setting will of now updated.s
Copy the Bucket Website Endpoint URL to clipboard as this will be required when creating the Cloudfront Configuration & Settings in the next step.
Make node of the URL provided on the bucket when enabling Static Website Hosting option.
Cloudfront Configuration & Settings
Firstly open the Cloudfront Console from within AWS, next click on the Create Distribution button which is located in the upper right corner.

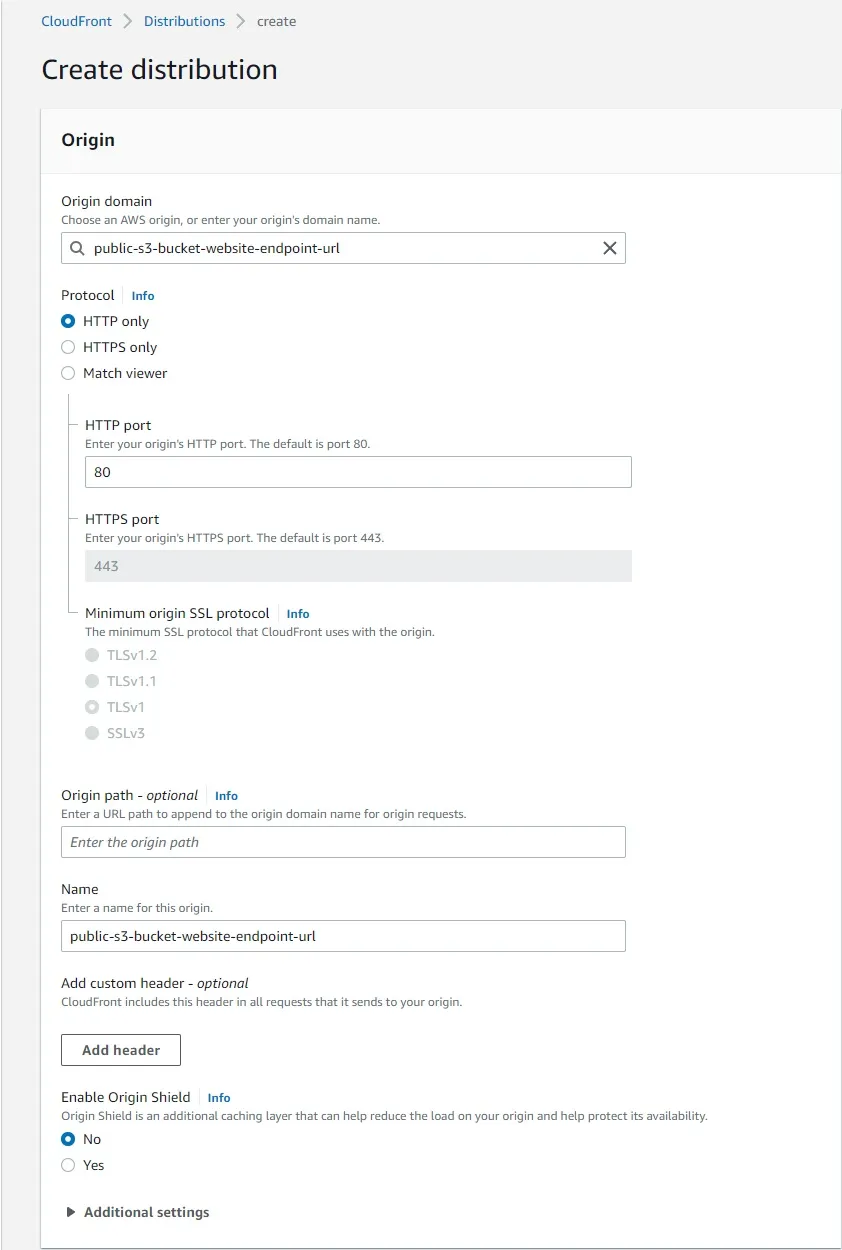
Enter the Bucket website endpoint, that was from the previous section into the Origin domain. Once done scroll down to Name and enter the name for this origin.
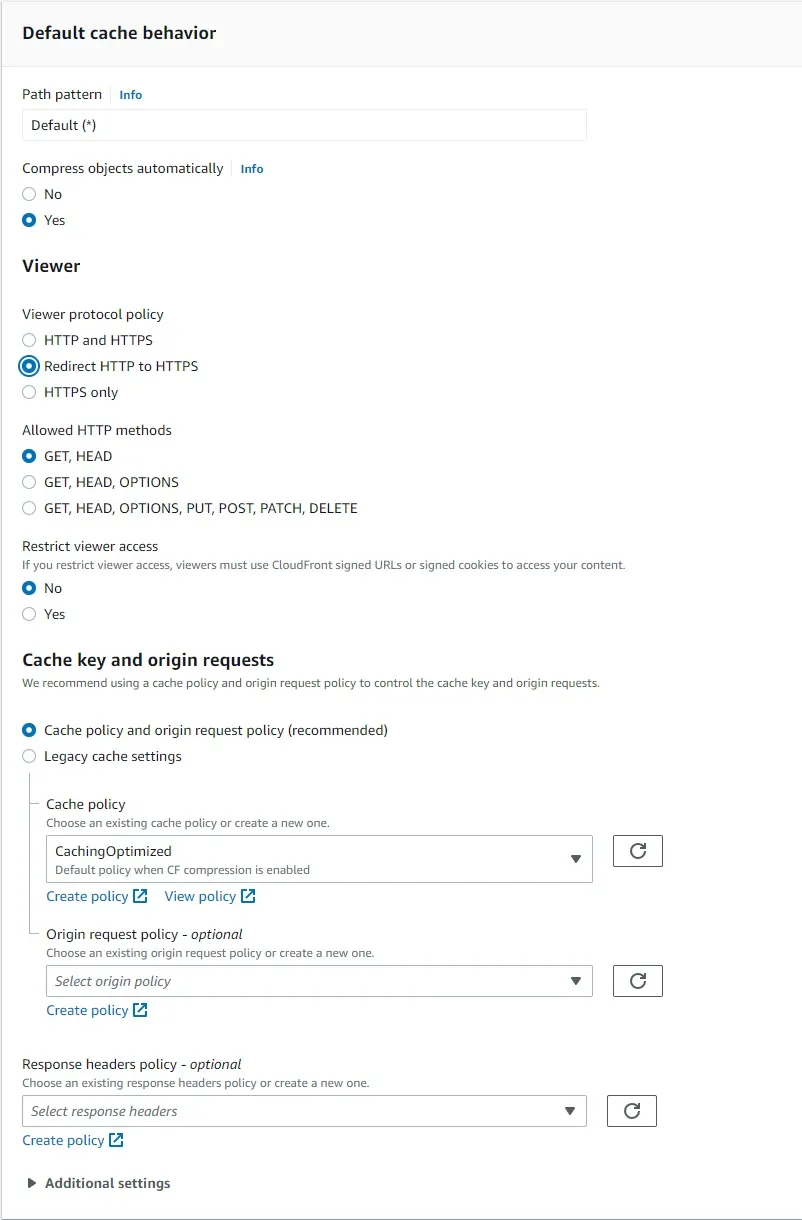
Next Default cache behaviour, under Viewer protocol policy set this to Redirect HTTP to HTTPS. Everything else can be left as the default options.
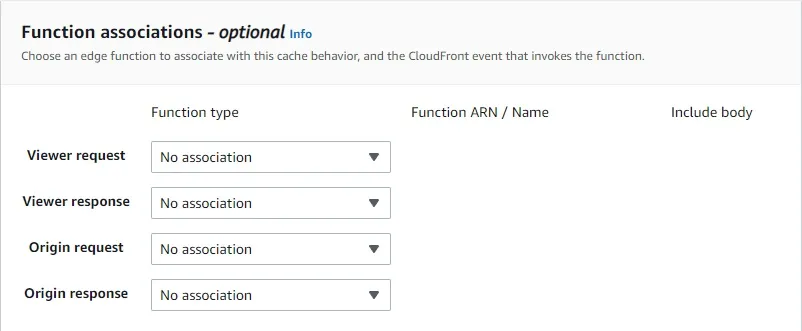
Functional associations nothing needs to be amended or altered here unless there are specific functions that are custom.
Note: Functions are not covered at all within this guide!
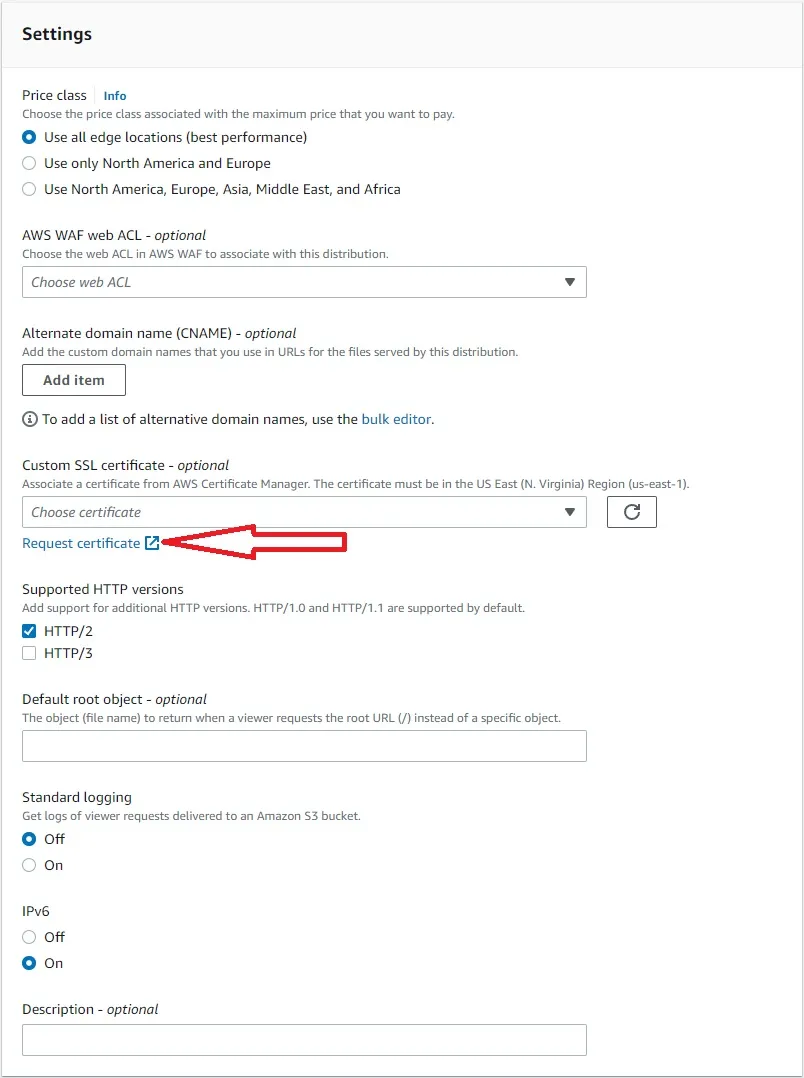
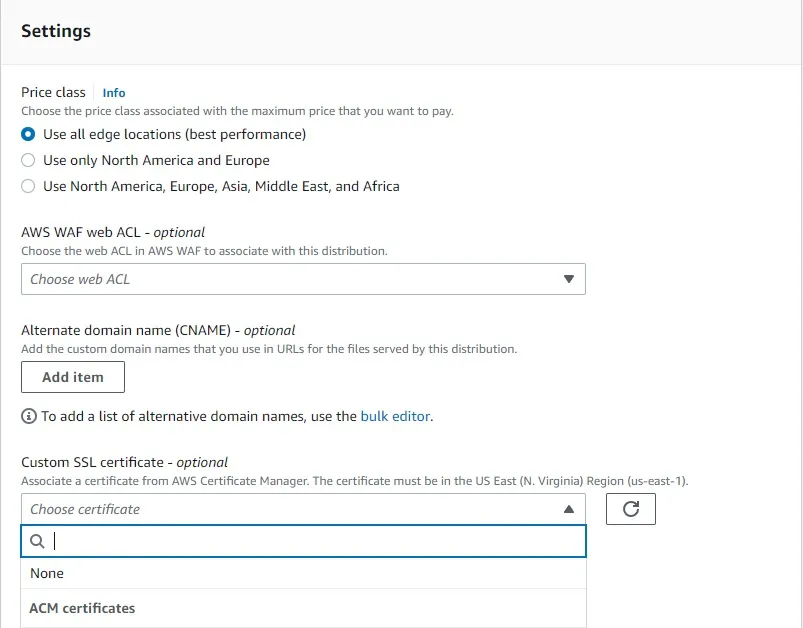
Now for Settings.. As shown on the image below, its time to request an SSL Certificate for the domain name that the content is going to be displayed under.
To do this select Request Certificate (will open in a new tab) and will open the window shown in the next image.
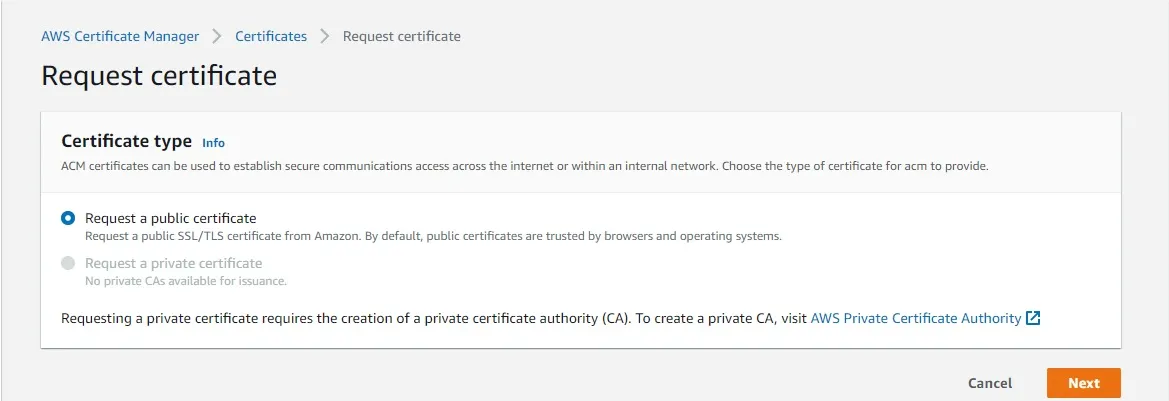
The window should open with a prompt to choose a certificate type, which should already have Request a public certificate selected. Press Next…
Next enter the full domain name, that is going to be used. For example public-domain.com and then select Add another name to this certificate and *.public-domain.com.
Note: the
There are two different methods for validation, either DNS validation - recommended which should already be selected, or Email validation. Ideally this should be done on a domain that access has been granted to or obtained to. If not consult with the relevant person / persons in order to obtain the access required in order to do a DNS Validation against the domain being used.
Once done, press on Request in the lower right corner.
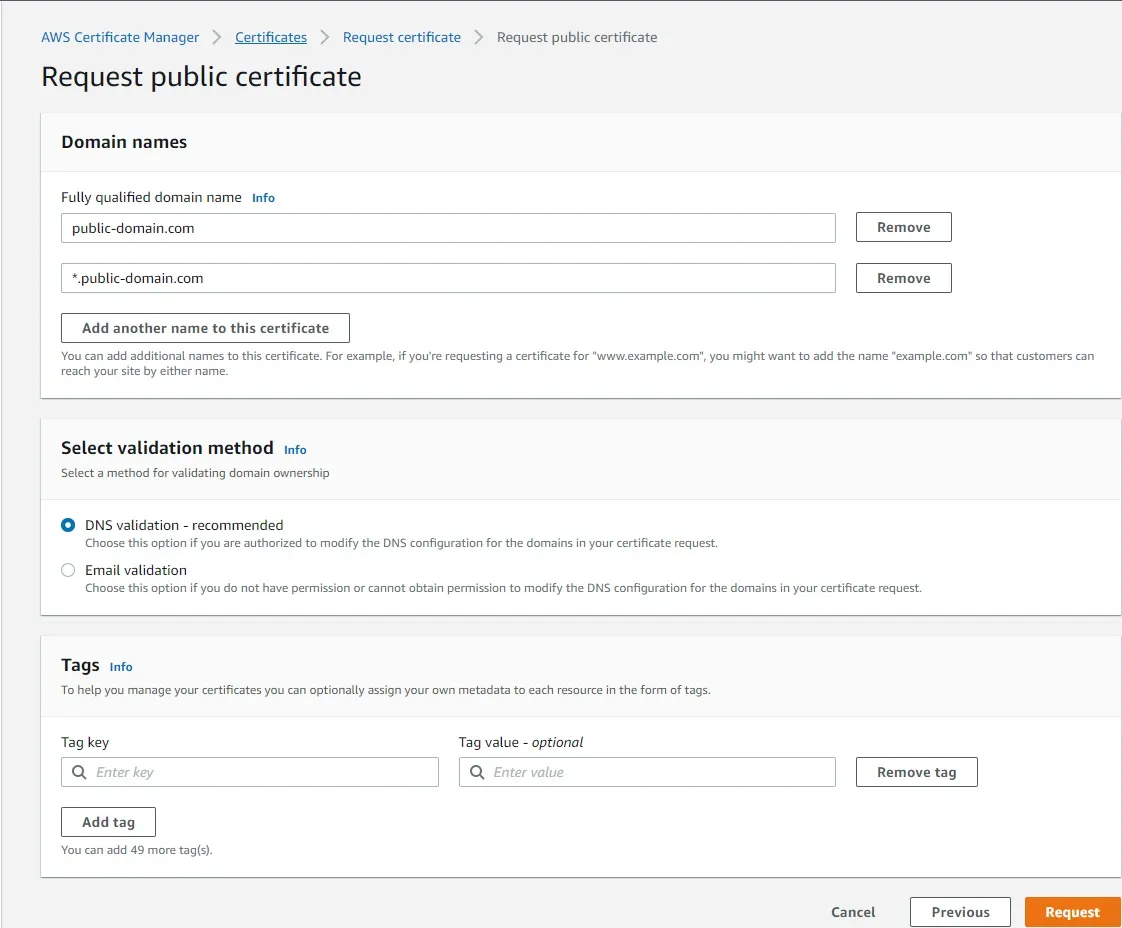
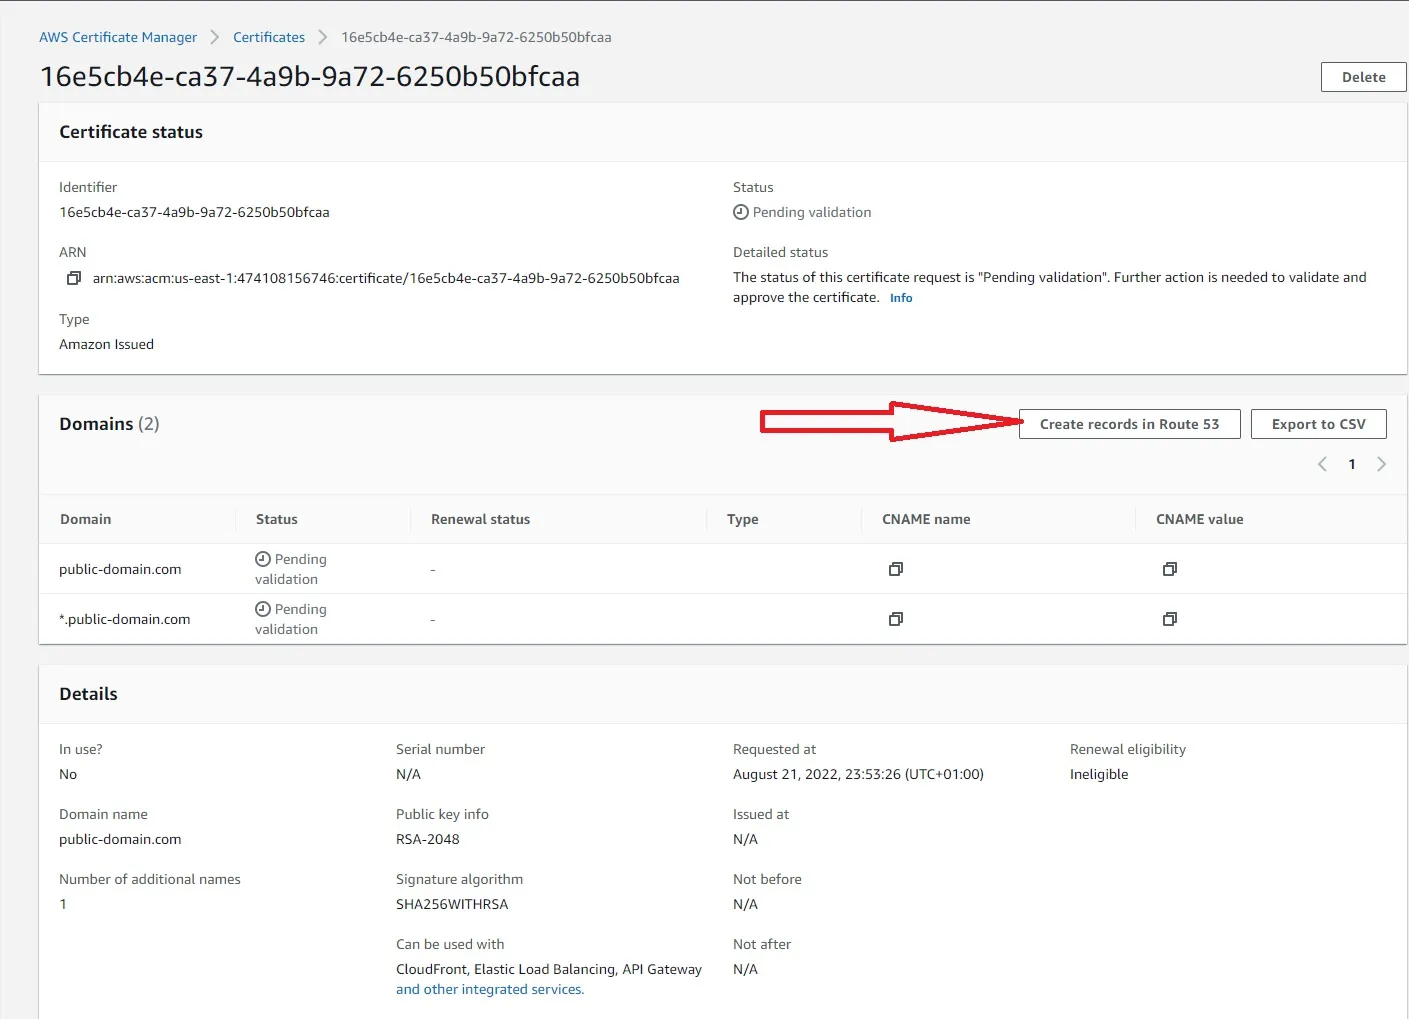
Now, to create the records required for the DNS Validation selected in the previous setup (before submitting the request, image above.)
There should be an option that says Create records in Route 53, this will automatically create the relevant records within the AWS Route53 service under the Hosted Zone within AWS itself. However if the DNS for the domain being used is not part of AWS and being used by an external provider, the CNAME name and CNAME value values can be used to valid the domain. However this may take longer than documented within the AWS documentation due to changes being made outside of AWS Services.
**Note: Requesting the certificate can take a while, so refreshing the page / console within the AWS Certificate Manager service maybe required in order to check the status of the certificate request.
Now the certificate has sucessfully be generated, it should appear within the Setting panel which was previously opened as part of creating the distribtion.
Press the Refresh Button at the end of the line under *Custom SSL certificate - optional`, when the panel refreshes.. the certificate for the domain that was requested previously should now be listed as a selectable option.
Make sure to select the Certificate, as this will be the SSL Certificate that be used when the public are accessing through the Public Domain name (set as the bucket name previously in this guide).
Now press on Create distribution as the bottom of the screen (lower right corner). This will start the Deployment of the distribution with the configuration entered above, as well as assign the SSL Certificate that was requested for the Public Domain.
Make sure to make a note of the URL that is provided under Domain name, as this WILL be required to Alias the public domain to point at the content being deployed by AWS Cloudfront.
AWS Route53 - Add A Record for Domain with Alias to Cloudfront Distribution URL
Firstly open the Route53 Console from within AWS and select the Hosted Zone (domain) which be used for the hugo website.
Once within that domain, select Create record as shown below

The window show now allow selection of Routing policy on this window specifically, select Simple routing should be selected by default.
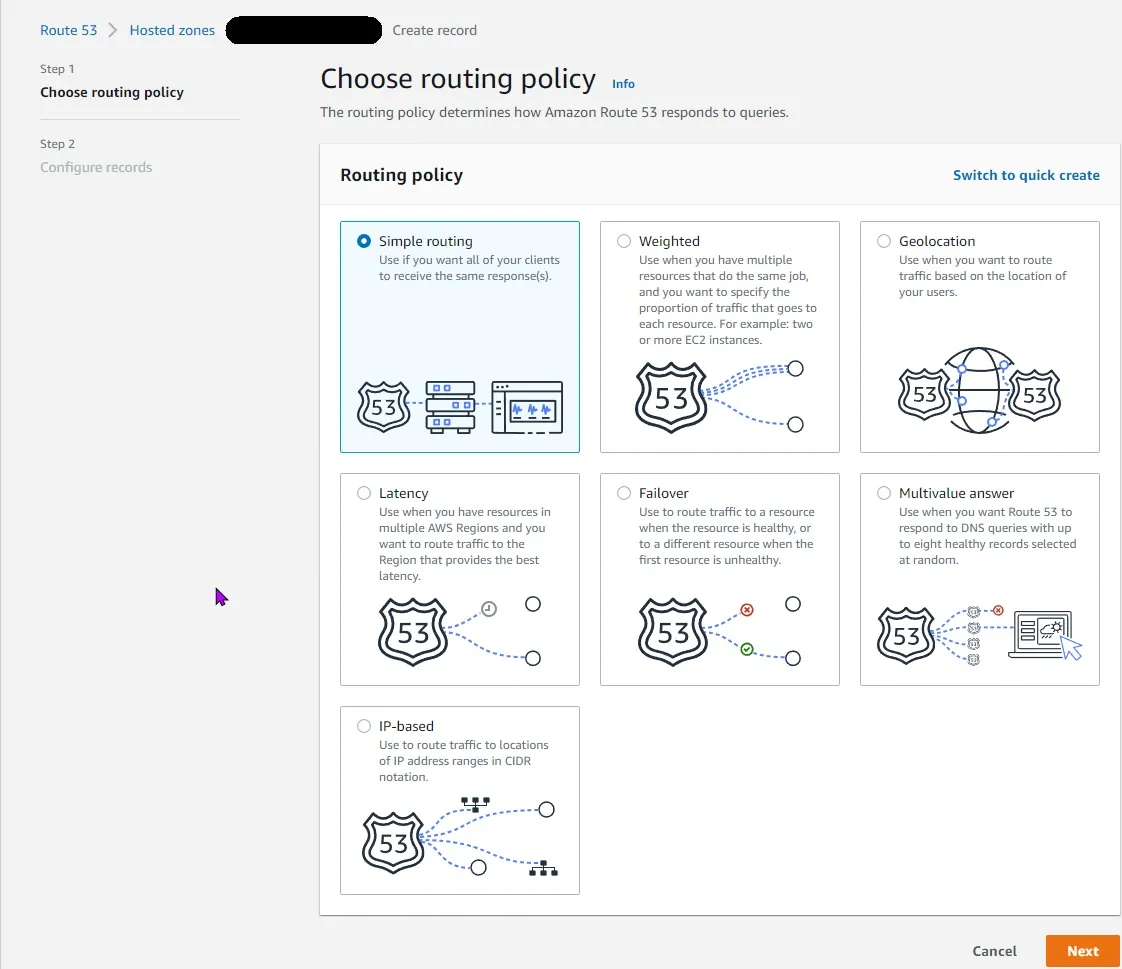
Next select Define simple record as shown below
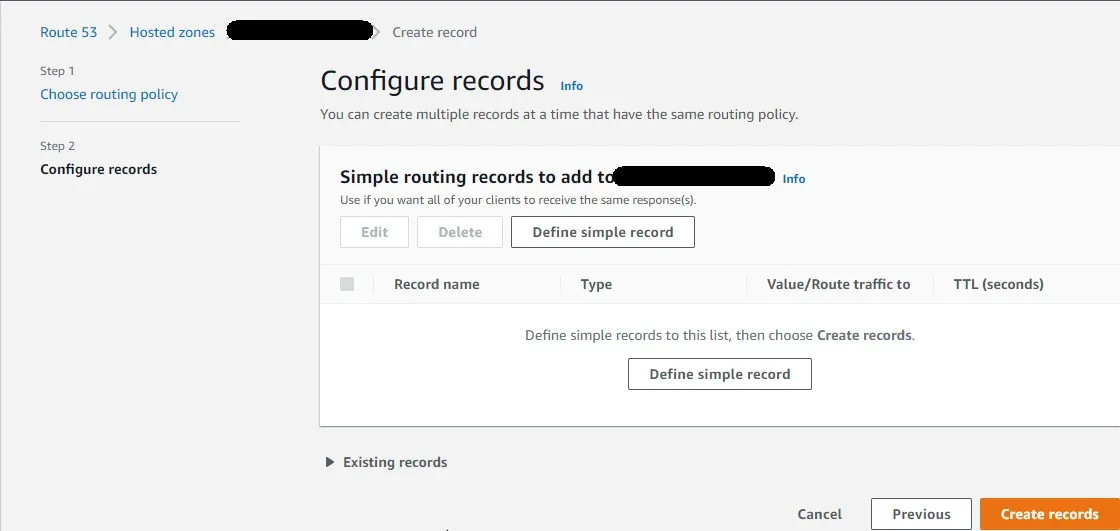
When the image appears to look like the below, do not enter anything into the subdomain box as the website will be using the root domain, change the value of record type.
Amend Value/Route traffic to so it says Alias to CloudFront distribution which should be an option from the dropdown menu on this field.
Once completed press Define simple records button, bottom right.
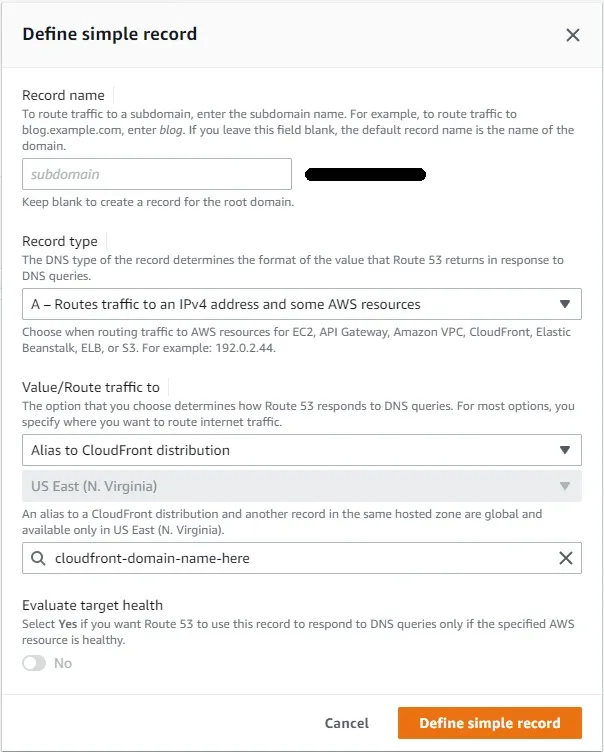
Now, the record should appear with the following fields populated, with the values matching the domain being used.
| Record name | Type | Value/Route traffic to | TTL (seconds) |
|---|---|---|---|
| Root Domain | A | Cloudfront Distribution Domain Name | - |
Check over the values and if happy press Create records in the lower right corner.
This will create the record, with the domain name chosed. Check to make sure that it works, however this may take some time before it updates 5/10 minutes.
proceed to the next step of the guide.. *Github Actions - Building The Hugo Website Project.
Github Actions - Creating the Action
Now code has been commited to the repository on Github, an S3 Bucket has been created and configured and a Cloudfront distribution created.
Its now time to automate the pushing of the code from Github to the S3 Bucket via Github Actions, below is a completed file of the process with annotations for each section / line.
Github Actions File - Completed File
Below is the completed Github Actions file with annotations to explain each section / line.
# Cross compile the website docker container and push to Docker Hubname: Build Hugo Site and Push over FTP
on:  push:    branches: [main]
jobs:  build:    runs-on: ubuntu-20.04    steps:      # Checks-out your repository under $GITHUB_WORKSPACE, so your job can access it      - name: Checkout        uses: actions/checkout@v2
      # Sets up Hugo within the Github Action space      - name: Setup Hugo        uses: peaceiris/actions-hugo@v2        with:          hugo-version: "0.91.2" # Hugo version used for the build step.
      # Builds the hugo project      - name: Build Site        run: hugo # command that hugo will run to build the project into the 'public' folder.
      # Invalidates AWS Cloudfront Distribution specified in the secrets configuration      - name: Invalidate CloudFront        uses: chetan/invalidate-cloudfront-action@v2        env:          DISTRIBUTION: ${{ secrets.DISTRIBUTION }} # Github Actions Secret Reference for 'DISTRIBUTION'          PATHS: "/*" # path used by Invalidation which is everything within the specified distribution. Note changing this may cause inconsistences with changes and updates.          AWS_REGION: "eu-west-1" # aws region of services          AWS_ACCESS_KEY_ID: ${{ secrets.AWS_KEY_ID }} # Github Actions Secret Reference for 'AWS Access Key ID'          AWS_SECRET_ACCESS_KEY: ${{ secrets.AWS_SECRET_ACCESS_KEY }} # Github Actions Secret Reference for 'Secret Access key'
      # Deploys / Pushes the code generated in 'Build Site' step above.      - name: Deploy Website To S3 Bucket        uses: jakejarvis/s3-sync-action@master        with:          args: --acl public-read --follow-symlinks --delete # specifies file / folder alterations using ACLs that are part of the bucket configuration step.        env:          AWS_S3_BUCKET: ${{ secrets.AWS_BUCKET }} # Github Actions Secret Reference for 'S3 Bucket' being used for the site hosting.          AWS_ACCESS_KEY_ID: ${{ secrets.AWS_KEY_ID }} # Github Actions Secret Reference for 'AWS Access Key ID'          AWS_SECRET_ACCESS_KEY: ${{ secrets.AWS_SECRET_ACCESS_KEY }} # Github Actions Secret Reference for 'Secret Access key'          AWS_REGION: 'eu-west-1'   # AWS Region for where services has been configured.          SOURCE_DIR: 'public'      # Source directory for content to be uploaded from. 'Public' is the folder generated in 'Build Site' step above.